Tuesday, May 26, 2020

Install kubectl on Ubuntu Instance | How to install kubectl in Ubuntu

Kubernetes uses a command line utility called kubectl for communicating with the cluster API server.
It is tool for controlling Kubernetes clusters. kubectl looks for a file named config in the $HOME/

How to install Kubectl in Ubuntu instance

Download keys from google website
curl -s https://packages.cloud.google.com/apt/doc/apt-key.gpg | sudo apt-key add -

Create the below file
sudo touch /etc/apt/sources.list.d/kubernetes.list

echo "deb http://apt.kubernetes.io/ kubernetes-xenial main" | sudo tee -a /etc/apt/sources.list.d/kubernetes.list

Update package manager
sudo apt-get update

Install
sudo apt-get install -y kubectl

Verify if kubectl got installed
kubectl version --short --client

How to install AWS authenticator | Install aws-iam-authenticator in Linux EC2


Download the Amazon EKS-vended aws-iam-authenticator binary from Amazon S3:
curl -o aws-iam-authenticator https://amazon-eks.s3.us-west-2.amazonaws.com/1.16.8/2020-04-16/bin/linux/amd64/aws-iam-authenticator

Give execute permissions to binary
chmod +x ./aws-iam-authenticator

Add binaries to PATH
mkdir -p $HOME/bin && cp ./aws-iam-authenticator $HOME/bin/aws-iam-authenticator && export PATH=$PATH:$HOME/bin

Add $HOME/bin to your PATH environment variable.
echo 'export PATH=$PATH:$HOME/bin' >> ~/.bashrc

Check version to make sure it got installed
aws-iam-authenticator version


How to install kubectl on Linux | Install kubectl on Amazon Linux / Red Hat Linux

Kubernetes uses a command line utility called kubectl for communicating with the cluster API server.

Download Amazon EKS-vended kubectl binary from Amazon S3
curl -o kubectl https://s3.us-west-2.amazonaws.com/amazon-eks/1.22.6/2022-03-09/bin/linux/amd64/kubectl

Apply execute permissions to the binary
chmod +x ./kubectl

Copy binary into a folder and add to path
mkdir -p $HOME/bin && cp ./kubectl $HOME/bin/kubectl && export PATH=$PATH:$HOME/bin

Add the $HOME/bin path to your shell initialization file so that it is configured when you open a shell.
echo 'export PATH=$PATH:$HOME/bin' >> ~/.bashrc

Verify if kubectl got installed
kubectl version --short --client

Client Version: v1.22.6-eks-7d68063


Thursday, May 21, 2020

Automate Docker builds using Jenkins - Dockerize Python App | Upload Images into AWS ECR

We will learn how to automate Docker builds using Jenkins. We will use Python based application. I have already created a repo with source code + Dockerfile. We will see how to create Docker image and upload into AWS ECR successfully.

- Automating builds
- Automating Docker image creation
- Automating Docker image upload into AWS ECR
- Automating Docker container provisioning

Pre-requisites:
1. Jenkins is up and running
2. Docker installed on Jenkins instance
3. Docker and Docker pipelines plug-in are installed  and Amazon ECR plug-in installed
4. Repo created in ECR, Click here to know how to do that.
5. port 8096 is opened up in firewall rules.
6. Access keys + secret keys from AWS account

Step # 1 - Add ECR Plug-in
Go to Jenkins, Manage Jenkins, Add Amazon ECR plug-in


Step #2 - Create Credentials for AWS ECR
Go to your Jenkins where you have installed Docker as well.
Go to credentials -->


Click on Global credentials
Click on Add Credentials


Choose AWS credentials
Add your AWS access keys and secret keys and save it

Note down the ID after saving.

Step # 3 - Create a scripted pipeline in Jenkins, name can be anything

Step # 4 - Copy the pipeline code from below
Make sure you change red highlighted values below:
Your account_d should be updated and repo should be updated.
your registry credentials ID from Jenkins from step # 1 should be copied


pipeline {
    agent any
    environment {
        registry = "account_id.dkr.ecr.us-east-2.amazonaws.com/myphpapp"
        //- update your credentials ID after creating credentials for connecting to Docker Hub
        registryCredential = 'Copy_ID_from_step_no_1_above'
        dockerImage = ''
    }
   
    stages {
        stage('Cloning Git') {
            steps {
                checkout([$class: 'GitSCM', branches: [[name: '*/master']], doGenerateSubmoduleConfigurations: false, extensions: [], submoduleCfg: [], userRemoteConfigs: [[credentialsId: '', url: 'https://github.com/akannan1087/myPythonDockerRepo']]])      
            }
        }
   
    // Building Docker images
    stage('Building image') {
      steps{
        script {
          dockerImage = docker.build registry
            docker.build('myphpapp')
        }
      }
    }
    
     // Uploading Docker images into Docker Hub
    stage('Upload Image to ECR') {
     steps{   
         script {
            docker.withRegistry( 'https://account_id.dkr.ecr.us-east-2.amazonaws.com', "ecr:us-east-2:$registryCredential" ) {
            docker.image("myphpapp"). push('latest')
            }
        }
      }
    }
   
     // Stopping Docker containers for cleaner Docker run
     stage('stop previous containers') {
         steps {
            sh 'docker ps -f name=mypythonContainer -q | xargs --no-run-if-empty docker container stop'
            sh 'docker container ls -a -fname=mypythonContainer -q | xargs -r docker container rm'
         }
       }
     
    // Running Docker container, make sure port 8096 is opened in
    stage('Docker Run') {
     steps{
         script {
            dockerImage.run("-p 8096:5000 --rm --name mypythonContainer")
         }
      }
    }
  }
}


Step # 5 - Click on Build - Build the pipeline
Once you create the pipeline and changes values per your ECR account id and credentials ID, click on Build now.

Steps # 6 - Check Docker images are uploaded into ECR
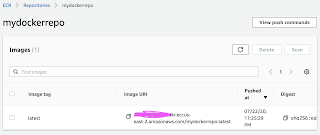
Login to ECR, click on your repo, now you should image got uploaded.


Steps # 7 - Access PHP App
Once build is successful, go to browser and enter http://public_dns_name:8096
You should see page like below:

Wednesday, May 20, 2020

How to setup Elastic Container Registry (ECR) for Docker on AWS | How to Create a Repo in ECR for Hosting Docker images | How to Push Docker image into Amazon ECR

Amazon Elastic Container Registry (ECR) is a fully managed container registry service provided by Amazon Web Services (AWS). It allows users to store, manage, and deploy Docker container images. Amazon ECR uses Amazon S3 for storage to make your container images highly available and accessible, allowing you to reliably deploy new containers for your applications. We will learn how to create ECR in AWS, will create a docker image and upload docker image into ECR.


What are we going to do in this lab?
1. Create a Repository in AWS ECR
2. Create an IAM role with ContainerRegistryFullAccess
3. Attach the IAM role to EC2 instance
4. Download pythonApp from Bitbucket
5. Build docker image for the Python App
6. Tag docker image
7. Login to AWS ECR using aws cli 
8. Push docker image into ECR
9. Run python app in Docker container

Pre-requisites:
Create a repo in ECR 

Go to AWS console and search for ECR

Click on Create Repository


Enter name for your repo - all lower case and Click create repository:


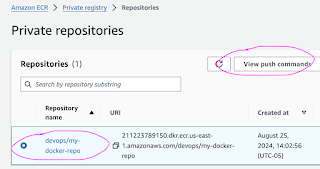
Once repo is created, choose the repo and click on view push commands. Note down the account ID


Note the URL from step # 3 below, this will be used for tagging and pushing docker images into ECR.

That's it, you have created repo successfully. Let us create docker images and push it to above repo in ECR.

Create an IAM role
You need to create an IAM role with AmazonEC2ContainerRegistryFullAccess policy.
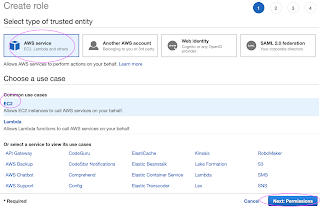
Go to AWS console, IAM, click on Roles. create a role


Select AWS services, Click EC2, Click on Next permissions.
 
 Now search for AmazonEC2ContainerRegistryFullAccess policy and click


Skip on create tag.
Now give a role name and create it.


You need to assign the role to EC2 instance you have installed docker.

Go to AWS console, click on EC2, select EC2 instance, Go to Actions --> Security--> Modify IAM role.


Choose the role you have created from the dropdown.
Select the role and click on Apply.

Now Login to EC2 instance where you have installed Docker. You must be able to connect to AWS ECR through AWS CLI which can be installed by

sudo apt install unzip -y
curl "https://awscli.amazonaws.com/awscli-exe-linux-x86_64.zip" -o "awscliv2.zip"
unzip awscliv2.zip
sudo ./aws/install

Once AWS CLI is installed, you can verify the installation:
aws --version
Now you can login to AWS ECR using CLI:
aws ecr get-login-password --region us-east-1 | docker login --username AWS --password-stdin your_acct_id.dkr.ecr.us-east-1.amazonaws.com

Where your_acct_id is from AWS ECR in the above picture.


You must get a message says Login succeeded. Now let's build a docker image, I have already created a public repo in Bitbucket. All you need to do is perform the below command to clone my repo:

git clone https://bitbucket.org/ananthkannan/mydockerrepo; cd mydockerrepo/pythonApp


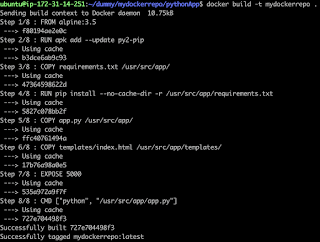
docker build . -t mypythonapp

the above command will build a docker image.


Now tag Docker image you had build
docker tag mypythonapp:latest your_acct_id.dkr.ecr.us-east-1.amazonaws.com/devops/your-ecr-repo-name:1.0


You can view the image you had built.


docker push your_acc_id.dkr.ecr.us-east-1.amazonaws.com/devops/your-ecr-repo-name:1.0
Now you should be able to login to ECR and see the images already uploaded.


How to run a Docker container from Docker image?

sudo docker run -p 8081:5000 -d --rm --name myfirstApp1  your_acc_id.dkr.ecr.us-east-1.amazonaws.com/devops/your-ecr-repo-name:1.0

where -d is for running with detached mode.

Access the application from the browser
Access the container using browser by using public_dns_name 
http://public_dns_name_your_ec2:8081


How to run another Docker container from Docker image?

sudo docker run -p 8085:5000 -d --rm --name myfirstApp2  your_acc_id.dkr.ecr.us-east-1.amazonaws.com/devops/your-ecr-repo-name:1.0

make sure you open port 8085 in AWS security firewall rule.
where -d is for running with detached mode.

 Note: You can also create a repo through CLI command in AWS ECR.
aws ecr create-repository --repository-name myawesome-repo --region us-east-1

You can watch the steps on YouTube as well:


Wednesday, May 13, 2020

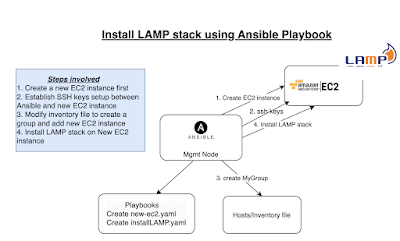
Ansible playbook for LAMP Installation on Ubuntu | Install LAMP stack using Ansible on Ubuntu 22.0.4

LAMP Stack comprises the following open-source software applications.

    • Linux – This is the operating system hosting the Applications.
    • Apache – Apache HTTP is a free and open-source cross-platform web server.
    • MySQL– Open Source relational database management system.
    • PHP – Programming/Scripting Language used for developing Web applications.
    Watch the steps in YouTube Channel:

    Pre-requisites:
    Steps to setup SSH keys:
    1. Login to Ansible management server/machine. Create SSH keys in Ansible host machine by executing the below command: (if you already have keys created, please skip this step)
    ssh-keygen 

    enter three times..now you will see keys successfully created.
    2.  Execute the below command on Ansible management node and copy the public key content:
    sudo cat ~/.ssh/id_rsa.pub

    copy the above output.
    3. Now login into target node where you want to install LAMP stack, execute the below command to open the file
    sudo vi /home/ubuntu/.ssh/authorized_keys
    type shift A and then enter now 
        and paste the key in the above file. please do not delete any existing values in this file.

    4. Now go back to Ansible mgmt node, do changes in /etc/ansible/hosts file to include the node you will be installing software. Make sure you add public or private IP address of target node as highlighted below in red color:
    sudo vi /etc/ansible/hosts
    [My_Group]  
    xx.xx.xx.xx ansible_ssh_user=ubuntu ansible_ssh_private_key_file=~/.ssh/id_rsa  ansible_python_interpreter=/usr/bin/python3

    Ansible playbook for installing LAMP(Linux Apache MySQL PHP) stack on Ubuntu

    sudo vi installLAMP.yml
    ---
    - hosts: My_Group
      tasks:
        - name: Task # 1 - Update APT package manager repositories cache
          become: true
          apt:
            update_cache: yes
        - name: Task # 2 - Install LAMP stack using Ansible
          become: yes
          apt:
            name: "{{ packages }}"
            state: present
          vars:
            packages:
               - apache2
               - mysql-server
               - php

    ansible-playbook installLAMP.yml


    This is the execution result of the playbook.

    Now go to browser and use target node DNS to confirm if Apache is installed. make sure port 80 is opened in security firewall rules.


    Now login to target EC2 instance, type below commands to verify PHP and MySql versions:

    php --version

    mysql --version

    Install Tomcat using Ansible playbook on Ubuntu - Install Tomcat on Ubuntu using Ansible playbook

    Playbook for installing Tomcat 9 on Ubuntu using Ansible Playbook

    sudo vi installTomcat.yml
    ---
    - hosts: My_Group
      tasks:
        - name: Install Tomcat 9 on Ubuntu
          become: yes
          apt: pkg={{ item }} state=latest update_cache=yes cache_valid_time=3600
          with_items:
            - tomcat9

    sudo ansible-playbook installTomcat.yml


    This is the execution result of Ansible playbook.

    How to create an Elastic IP Address in AWS and assign to your EC2 instance | Associate Elastic IP address to EC2 instance

    Elastic IP address is static IP address provided by AWS, you should avoid using public ip address as it changes every stop/start of EC2 instance.

    How to create Elastic IP address:

    Go to AWS console, Click on EC2, Elastic IPs.

    Click on Allocate Elastic IP address


    Now it should create Elastic IP address.


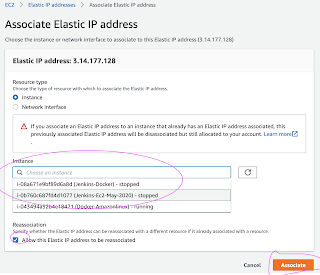
    Click on Actions, Associate Elastic IP address and choose your instance from Instances textbox and pick up the Private ip address automatically.

    That's it! Elastic IP(static) address have been assigned to your EC2 instance.

    Friday, May 8, 2020

    How to create declarative pipeline - Jenkins pipeline as code | How to create Jenkinsfile

    Please find steps below for configuring Declarative Pipeline - Pipeline as a code - Jenkinsfile.

    Pre-requistes:

    1. Project setup in Bitbucket/GitHub/GitLab
    2. Jenkins and Tomcat (web container) set up.
    3. Maven installed in Jenkins
    4. Sonarqube setup and integrated with Jenkins
    5. Artifactory configured and integrated with Jenkins
    6. Slack channel configured an integrated with Jenkins

    Create Jenkinsfile (pipeline code) to your MyWebApp

    Step 1

    Go to GitHub and choose the Repo where you setup MyWebApp in Lab exercise # 2

    Step 2
    Click on create new file.

    Step 3 - Enter Jenkinsfile as a file name
    Step 4

    Copy and paste the below code and make sure what ever is highlighted in red color needs to be changed per your settings.

    That's it. Pipeline as a code - Jenkinsfile is setup in GitHub.

    rtMaven = null
    server= null
    pipeline {
      agent any

      tools {
        maven 'Maven3'
      }
      stages {
        stage ('Build') {
          steps {
          sh 'mvn clean install -f MyWebApp/pom.xml'
          }
        }
        stage ('Code Quality') {
          steps {
            withSonarQubeEnv('SonarQube') {
            sh 'mvn -f MyWebApp/pom.xml sonar:sonar'
            }
          }
        }
        stage ('JaCoCo') {
          steps {
          jacoco()
          }
        }
        stage ('Artifactory Upload') 
    {
          steps {
            script {
              server = Artifactory.server('My_Artifactory')
              rtMaven = Artifactory.newMavenBuild()
              rtMaven.tool = 'Maven3'
              rtMaven.deployer releaseRepo: 'libs-release-local', snapshotRepo: 'libs-snapshot-local', server: server
              rtMaven.resolver releaseRepo: 'libs-release', snapshotRepo: 'libs-snapshot', server: server
              rtMaven.deployer.deployArtifacts = false // Disable artifacts deployment during Maven run
              buildInfo = Artifactory.newBuildInfo()
              rtMaven.run pom: 'MyWebApp/pom.xml', goals: 'install', buildInfo: buildInfo
              rtMaven.deployer.deployArtifacts buildInfo
              server.publishBuildInfo buildInfo
            }
          }
        }
        stage ('DEV Deploy') {
          steps {
          echo "deploying to DEV Env "
          deploy adapters: [tomcat8(credentialsId: '268c42f6-f2f5-488f-b2aa-f2374d229b2e', path: '', url: 'http://localhost:8090')], contextPath: null, war: '**/*.war'
          }
        }
        stage ('Slack Dev Notification') {
          steps {
            echo "deployed to DEV Env successfully"
            slackSend(channel:'your slack channel_name', message: "Job is successful, here is the info - Job '${env.JOB_NAME} [${env.BUILD_NUMBER}]' (${env.BUILD_URL})")
          }
        }
        stage ('QA Approve') {
          steps {
            echo "Taking approval from QA manager"
            timeout(time: 7, unit: 'DAYS') {
            input message: 'Do you want to proceed to QA Deploy?', submitter: 'admin,manager_userid'
            }
          }
        }
        stage ('QA Deploy') {
          steps {
            echo "deploying to QA Env "
            deploy adapters: [tomcat8(credentialsId: '268c42f6-f2f5-488f-b2aa-f2374d229b2e', path: '', url: 'http://your_dns_name:8090')], contextPath: null, war: '**/*.war'
            }
        }
        stage ('Slack QA Notification') {
          steps {
            echo "Deployed to QA Env successfully"
            slackSend(channel:'your slack channel_name', message: "Job is successful, here is the info - Job '${env.JOB_NAME} [${env.BUILD_NUMBER}]' (${env.BUILD_URL})")
          }
        }
      }
    }

    Step 5
    That's it. Pipeline as a code - Jenkinsfile is setup in GitHub.

    Click on commit to save into GitHub.

    Create Pipeline and Run pipeline from Jenkinsfile

    1. Login to Jenkins
    2. Click on New item, give some name and choose Pipeline and say OK


    3. Under build triggers, choose Poll SCM,
    Enter H/02 * * * *


    4. Under Pipeline section. click on choose pipeline script from SCM

    5. Under SCM, choose Git


    6. Enter HTTPS URL of repo and choose credentials - enter user name/password of GitHub.
    Script path as Jenkinsfile

    7. Click on Apply and Save
    8. Click on Build now.

    You should see pipeline running and application is deployed to Tomcat.