Monday, September 24, 2018

How to enable code coverage report using JaCoCo plug-in - Code coverage Report using JaCoCo, Maven and Jenkins - Code Coverage in Pipeline

Code coverage is important aspect for maintaining quality in Agile development. There are different ways to manage code quality. one of the effective ways is to measure code coverage by using plug-ins such as JaCoCo, Cobertura.

We will see how to enable code coverage for your Java project and view coverage report in Jenkins UI.

step # 1: Add Maven JaCoCo plugin in POM.xml under MyWebApp in bitbucket Repo

<build>
<finalName>MyWebApp</finalName>
<plugins>
<plugin>
<groupId>org.jacoco</groupId>
<artifactId>jacoco-maven-plugin</artifactId>
<version>0.7.7.201606060606</version>
<executions>
<execution>
<id>jacoco-initialize</id>
<goals>
<goal>prepare-agent</goal>
</goals>
</execution>
<execution>
<id>jacoco-report</id>
<phase>test</phase>
<goals>
<goal>report</goal>
</goals>
</execution>
</executions>
</plugin>
</plugins>
</build>


Step 2 : Add JaCoCo plug-in in Jenkins:


Step 3:

For Freestyle Job:
Enable in Jenkins job to view code coverage report by going to post build action and add Record JaCoCo coverage report


For Pipelines:
Add below code in your existing pipeline:

stage ('Code coverage') {
jacoco()
}

Step 4 : Run the job by clicking Build now

Step 5:
 Click on the job to view code coverage report.

Friday, September 21, 2018

How to enable Multi Factor Authentication (MFA) for your AWS account? - Enable MFA to AWS account - Secure AWS Account

It is very important to secure your AWS account. Especially for those who is creating new AWS account, as hackers are potentially targeting new accounts.

Let us see the how to secure AWS accounts by enabling multi factor authentication?

1. Login to AWS.
2. Click on your user name. Click on My Security Credentials.


3. Continue to security credentials.


4. Click on Multi-factor authentication, click on Activate MFA


5. Now choose A Virtual MFA device


6.  Click on Next step


7. Now download google authenticator or Microsoft authenticator on your smart phone
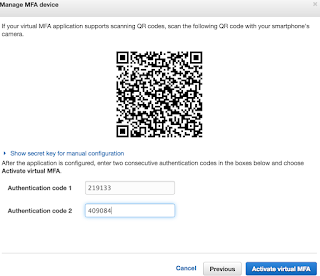
8. After downloaded, click on + scan bar code. Scan the above bar code.
you need to enter first number and wait until it expires, enter second number in code 2 and then click on Activate Virtual MFA.


9. Once entered both numbers, click on Activate Virtual MFA.

This is how you secure AWS account by enabling MFA.

Wednesday, September 12, 2018

How to integrate SonarQube in Azure DevOps - Setup SonarQube code analysis in VSTS or Azure DevOps

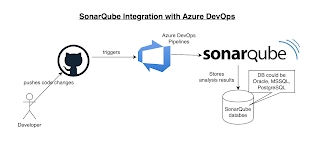
Please find steps below for integrating SonarQube with Azure DevOps or Visual Studio Team Services:


Pre-requisites:
1. Make sure you install SonarQube plug-in/Add-on in VSTS (Azure DevOps) using below URL:
https://marketplace.visualstudio.com/acquisition?itemName=SonarSource.sonarqube


Once added SonarQube plug-in, click on proceed to Organization..


Steps:
1. Login to Azure DevOps. Go to Azure Pipelines. Edit your pipeline


2. Click on Add tasks
3. Enter Sonar


4. Add Prepare Analysis configuration
5. move up this task.
It should be like shown below:

6. Edit prepare sonar analysis configuration task


7. Click on New service connection

 8. Enter name as mySonarServer and put in SonarQube url including port number and use the token generated

9. Choose that name and select Integrate with Maven or Gradle


10. Edit maven task and add clean install sonar:sonar


11. Run the build, it should integrate with Sonar and should do code analysis.


Saturday, September 1, 2018

How to create Jenkinsfile and configure Pipeline as Code - Jenkins Pipeline As code

Please find steps below for configuring your existing pipeline as a code (Jenkinsfile).

Pre-requistes:

1. Project setup in Bitbucket or GitHub
2. Jenkins and Tomcat (web container) set up.
3. Maven installed as well
4. Sonarqube setup and integrated with Jenkins

Add Jenkinsfile (pipeline code) to MyWebApp in BitBucket.

Step 1.

Go to Bitbucket and choose the Repo where you setup MyWebApp.

Step 2

Click on three dots ... and Add File

Step 3
Enter Jenkinsfile as a file name


Step 4

Copy and paste the below code

node {
def mvnHome = tool 'Maven3'

stage ('Checkout') {

checkout scm
}

stage ('Build') {
sh "${mvnHome}/bin/mvn clean install -f MyWebApp/pom.xml"
}


stage ('Code quality scan') {
withSonarQubeEnv('SonarQube') {
sh "${mvnHome}/bin/mvn sonar:sonar -f MyWebApp/pom.xml"
   }
}


    stage ('Nexus upload')
    {
        nexusArtifactUploader(
        nexusVersion: 'nexus3',
        protocol: 'http',
        nexusUrl: 'ec2-18-223-182-14.us-east-2.compute.amazonaws.com:8081',
        groupId: 'myGroupId',
        version: '1.0-SNAPSHOT',
        repository: 'maven-snapshots',
        credentialsId: '2c293828-9509-49b4-a6e7-77f3ceae7b39',
        artifacts: [
            [artifactId: 'MyWebApp',
             classifier: '',
             file: 'MyWebApp/target/MyWebApp.war',
             type: 'war']
        ]
     )
    }


stage ('DEV Deploy') {
echo "deploying to DEV tomcat "
sh 'sudo cp /var/lib/jenkins/workspace/$JOB_NAME/MyWebApp/target/MyWebApp.war /var/lib/tomcat8/webapps'
}
stage ('DEV Approve') {
echo "Taking approval from DEV"
timeout(time: 7, unit: 'DAYS') {
input message: 'Do you want to deploy?', submitter: 'admin'
     }

 }

stage ('Slack notification') {
slackSend(channel:'channel-name', message: "Job is successful, here is the info - Job '${env.JOB_NAME} [${env.BUILD_NUMBER}]' (${env.BUILD_URL})")
  }
}


Step 5
Click on Commit and enter comments


Click on Commit

That's it. Pipeline as a code - Jenkinsfile is setup in BitBucket.

Create Pipeline and Run pipeline from Jenkinsfile

1. Login to Jenkins
2. Click on New item, give some name and choose Pipeline and say OK


3. Under build triggers, choose Poll SCM,
Enter H/02 * * * *


4. Under Pipeline section. click on choose pipeline script from SCM

5. Under SCM, choose Git


6. Enter SSH or HTTPS URL of repo and choose credentials - SSH private key if you are using SSH url. or user/password of GitHub if you are using HTTPS url.

Script path as Jenkinsfile


7. Click on Apply and Save
8. Click on Build now.
You should see pipeline running and application is deployed to Tomcat.