Friday, March 30, 2018

Install TeamCity on Ubuntu with MySQL | Teamcity install on Ubuntu with MySQL

Please find steps involved in installing TeamCity on Ubuntu server with MySQL:

Pre-requistes:
Make sure instance has at least 2 GB RAM memory(for EC2 at least small instance)
Open port 8111 in security firewall.

Here below are the steps:

Java Installation
sudo apt-get update
sudo add-apt-repository ppa:webupd8team/java
sudo apt-get update
sudo apt-get install oracle-java8-installer -y

Teamcity Installation
First download the teamcity latest version.
sudo wget https://download.jetbrains.com/teamcity/TeamCity-2017.2.3.tar.gz
tar vxfz TeamCity-2017.2.3.tar.gz
sudo mkdir /opt/jetbrains
sudo mv TeamCity/ /opt/jetbrains
sudo useradd teamcity

Create as a start up service
sudo vi /etc/init.d/teamcity
#!/bin/sh
# /etc/init.d/teamcity -  startup script for teamcity
export TEAMCITY_DATA_PATH="/opt/jetbrains/TeamCity/.BuildServer"
export TEAMCITY_SERVER_OPTS=-Djava.awt.headless=true # Configure TeamCity for use on a headless OS.

case $1 in
start)
 start-stop-daemon --start  -c teamcity --exec /opt/jetbrains/TeamCity/bin/runAll.sh start
;;

stop)
 start-stop-daemon --start -c teamcity  --exec  /opt/jetbrains/TeamCity/bin/runAll.sh stop
;;

esac

exit 0
sudo chmod +x /etc/init.d/teamcity
sudo update-rc.d teamcity defaults

sudo chown -R ubuntu:ubuntu /opt/jetbrains/TeamCity
sudo service teamcity start
Open browser and access teamcity home page
http://server_ip:8111/

Click on Proceed
Now stop the Teamcity server
sudo service teamcity status
sudo service teamcity stop


MySQL Installation
TeamCity needs a database to run. You have options to choose Postgres, MySQL or any database.
Let us try with MySQL.

sudo apt-get install mysql-server -y
enter a password for default user root and repeat the password
sudo mysql -u root -p
Now execute all the commands:
create database teamcity character set UTF8 collate utf8_bin;
Use teamcity;
create user 'teamcityuser'@'localhost' identified by 'password';
grant all privileges on teamcity.* to 'teamcityuser'@'localhost';

type exit to come out

Download MySQL JDBC driver

sudo wget http://dev.mysql.com/get/Downloads/Connector-J/mysql-connector-java-5.1.31.tar.gz -O mysql-connector.tar.gz
sudo tar zxvf mysql-connector.tar.gz
cd mysql-connector-java-5.1.31/
sudo mv mysql-connector-java-5.1.31-bin.jar /opt/jetbrains/TeamCity/.BuildServer/lib/jdbc/

cd /opt/jetbrains/TeamCity/.BuildServer/lib/jdbc
mv ? mysql-connector-java-5.1.31-bin.jar
sudo chown -R teamcity:teamcity /opt/jetbrains/TeamCity
sudo chown teamcity:teamcity /opt/jetbrains/TeamCity/.BuildServer/lib/jdbc/mysql-connector-java-5.1.31-bin.jar
sudo service teamcity start
Open browser, type http://serverip:8111/
Click proceed and select MySQL as database type
Click on Proceed
enter database name as teamcity
user as teamcityuser
password as password
leave host as it is
Click on Proceed
Agree the License agreement

Tuesday, March 27, 2018

insserv: warning: script missing LSB tags and overrides

If you get any errors or warning like below:
insserv: warning: script 'teamcity' missing LSB tags and overrides

Apply the below fix:

sudo apt-get remove insserv


Sunday, March 25, 2018

How to make sure if Puppet agent does pull from master after configuration change?

How to make sure if Puppet agent does pull from master after configuration change?
Login to Puppet Agent node
Remove apache first..
1. sudo apt-get remove apache2 -y

2. Make sure apache is not running by going to browser running public dns name. Once verified,
3. edit the below file

sudo vi /etc/puppetlabs/puppet/puppet.conf
#Add below entry
runinterval = 120
4. Now stop the agent
sudo systemctl stop puppet
5. start puppet agent again
sudo systemctl start puppet

Now after 2 mins Apache will be installed on the Agent and you will be able to see the Apache web page in the browser


Wednesday, March 21, 2018

How to add an existing project into bitbucket using command line ?

Let us say you have a project created along with source code. Now you would like to check-in the project into Bitbucket. How will you do it?

Pre-requistes:

1. Make sure Git is installed on that machine.
2. Make sure you add SSH keys to bitbucket.

1. Create a new repo in Bitbucket. Do not create README file yet.
2. Open git bash or command line terminal
3. navigate to your directory where you have source files.
4. run the below command to initialize the  directory as local repository.
       git init
5. Execute git add .
6. git commit -m "my project setup in bitbucket"
7. git remote add origin remote repository URL
8. git push -u origin master

Now login to Bitbucket and make sure code is available under Source tab for the repo.

Not able to access the spring boot application deployed on a docker container

I had this issue of not able to access the springboot app deployed inside the container. Even though the port is opened in security firewall settings, I was not able to access the app. Later on I found out springboot App default has embedded Tomcat which is running on port 8080.

you need to create application.properties under src/main/resources and add server.port in the file
server.port=8085

now build the springboot jar and build the image and run the container.

That issue should go away.


Tuesday, March 20, 2018

How to setup SonarQube Plug-ins in Teamcity?

Please follow the below steps for configuring Sonarqube plug-ins with Teamcity server.
Open TeamCity Git bash/iterm window

1. cd  /opt/JetBrains/TeamCity/.BuildServer/plugins/ 

download the plug-in to above location by executing below command where you enter userid like below marked red.
2. sudo wget --user=teamcitydevops --ask-password https://teamcity.jetbrains.com/repository/download/TeamCityPluginsByJetBrains_TeamCitySonarQubePlugin_Build20171x/1802362:id/sonar-plugin.zip

3. Password will be provided by Coach.
make sure sonar-plugin.zip is downloaded in /opt/JetBrains/TeamCity/.BuildServer/plugins/

Restart Team city
4. sudo /etc/init.d/teamcity stop
5. sudo /etc/init.d/teamcity start


Now click on administration, Click on Plug-ins list. You should see Sonarqube plug-ins appearing.


Monday, March 19, 2018

How to configure pipelines in Teamcity - Create Pipelines in TeamCity - Integrate with Tomcat and SonarQube

Let us see how to create pipeline using Teamcity.

Pre-requistes:

1. Project is set up either in Bitbucket or Github or which ever the repository you use.
2. user to perform admin task in teamcity.
3. Tomcat set up and running for deployment with username and password configured in tomcat-users.xml

Steps:

1. Click on Administration in Teamcity
2. Click on Create project
3. Choose Repository URL
4. Enter repo url from Bitbucket or GitHub
5. Enter bitbucket credentials - username/password

6. Now it will show the project
7. Click on Proceed.
8. Pick the project for the build steps
9. Edit maven goals as clean install.
10. Now add another build step
Choose Container deployer.
11. Enter hostname:port for tomcat. do not put http before hostname.
username as tomcat and password for tomcat
MyWebApp/target/MyWebApp.war
12. Click on Save
13. Now click on Run

Click on Build Log to see any error.

After build is successful, make sure you are able to access the webapp in Tomcat.

How to setup SonarQube plug-in in TeamCity:

https://www.cidevops.com/2018/03/how-to-set-up-sonarqube-plug-ins-in.html

Now let us see how to integrate with SonarQube:

1. Click on another Build step 
2. Add SonarQube Runner 
3. Click on SonarQube Servers tab
4. Click on Add New server 


5. provide name, URL and login info.
6. Now go back to build steps
7. Add SonarQube server
8. give MyWebApp as source location.
9. Now run the build. it should integrate with Sonarqube

Sunday, March 18, 2018

How to make changes in Linux machine using vi editor?

1. press i or insert
2. make the changes (avoid using mouse)
3. press escape button
4. :wq! (saving and exiting the file after changes)
5: enter

Friday, March 16, 2018

Install LAMP stack using Puppet on the Node - How to install LAMP stack using Puppet

How to install LAMP (Apache, MySQL, PHP) stack in target node?


Pre-requisites:
Pupper master up and running
Puppet agent is installed on the node.

Login to Puppet Master, follow the below steps:

1. cd /opt/puppetlabs/puppet/modules
2. sudo mkdir lamp
3. cd lamp
4. sudo mkdir manifests
5. cd manifests
6. sudo vi init.pp
6. Copy the below lines in init.pp

class lamp {
# execute 'apt-get update'
exec { 'apt-update':                    # exec resource named 'apt-update'
  command => '/usr/bin/apt-get update'  # command this resource will run
}

# install apache2 package
package { 'apache2':
  require => Exec['apt-update'],        # require 'apt-update' before installing
  ensure => installed,
}

# ensure apache2 service is running
service { 'apache2':
  ensure => running,
}

# install mysql-server package
package { 'mysql-server':
  require => Exec['apt-update'],        # require 'apt-update' before installing
  ensure => installed,
}

# ensure mysql service is running
service { 'mysql':
  ensure => running,
}

# install php7 package
package { 'php7.0-cli':
  require => Exec['apt-update'],        # require 'apt-update' before installing
  ensure => installed,
}

# ensure info.php file exists
file { '/var/www/html/info.php':
  ensure => file,
  content => '<?php  phpinfo(); ?>',    # phpinfo code
  require => Package['apache2'],        # require 'apache2' package before creating
}
}

7. sudo vi /etc/puppetlabs/code/environments/production/manifests/site.pp
Add below line of code where node should be your target node where you already approved the certificate. the highlighted below section needs to be changed:

node 'your_target_puppet_agent_node_private_DNS_name' {
 include lamp
 }

8. Now to login to puppet agent node, execute the below command:
sudo /opt/puppetlabs/bin/puppet agent --test

You should see message like below:

9. Now make sure Apache is running on the target node by entering the target node(Agent's) public IP address on the browser. You should see Apache home page in the browser.
 
You can verify if PHP and MySQL installed in target(Agent) instance.

php --version
mysql --version

Run Jenkins from Docker

Pre-requisites:
make sure you have installed Docker on the host.

sudo docker run -p 8080:8080 --name myjenkins jenkins

Terminate EC2 instances Ansible Playbook Example | How to terminate EC2 instances using Ansible playbook?

Please find a simple Ansible playbook for terminating EC2 instance in AWS using instance id.

Pre-requisites:
Make sure you create an IAM role with AmazonEC2FullAccess policy and attach the role to EC2 instance where Ansible was installed.

Watch the steps in YouTube channel:

Login to EC2 instance using Git bash or ITerm/putty where you installed Ansible. Execute the below command to edit Ansible hosts or inventory file

sudo vi /etc/ansible/hosts 

Add the below two lines in the end of the file:
[localhost]
local

save the file and come out of it.

Create the playbook by executing below command:

sudo vi terminate.yml 
---
 - name: ec2 provisioning using Ansible
   hosts: local
   connection: local
   gather_facts: False

 - hosts: local
   gather_facts: False
   connection: local
   vars:
     - region: 'us-east-1'
     - ec2_id: 'i-05f39cfb80c97df38'
   tasks:
     - name: Terminate instances
       ec2_instance:
         state='absent'
         instance_ids='{{ ec2_id }}'
         region='{{ region }}'

This playbook can be executed by two ways. Either mention instance ID in the ansible playbook or pass as an argument. Intstance Id can be taken from AWS mgmt console.


ansible-playbook terminate.yml -e ec2_id=i-xxxx
PLAY [ec2 provisioning using Ansible] *********************************************************************
PLAY [local] **********************************************************************************************
TASK [Terminate instances] ********************************************************************************
ok: [local -> localhost]

PLAY RECAP ************************************************************************************************
local                      : ok=1    changed=0    unreachable=0    failed=0


boto3 required for this module error | Ansible Boto required for this module

Here is the fix boto3 required for this module error:

You need to install Phython Pip manager first.
sudo apt install python-pip

then install Boto3 module using Pip
 
sudo pip install boto boto3

Saturday, March 10, 2018

Playbook for installing Apache on Ubuntu - Ansible Playbook for installing Apache on Ubuntu

Please find steps for installing Apache software on nodes using Ansible in Ubuntu EC2:

1. Login to Ansible machine. Create SSH keys in Ansible host machine by executing the below command:
ssh-keygen
2. Copy the public keys(id_rsa.pub) from ansible node each node in /home/ubuntu/.ssh/authorized_keys file. Execute the below command on Ansible and copy the content:
    sudo cat ~/.ssh/id_rsa.pub

3. Now login to target node, execute the below command to open the file
 sudo vi /home/ubuntu/.ssh/authorized_keys
type shift A and then enter. now 
    and paste the key in the above file. please do not delete any existing keys.

4. go back to ansible mgmt node, make sure you are able to ssh from ansible mgmt node after copying the keys above:
  ssh private_ip_of_target_node
now type exit to come out of the target node.
5. Now in ansible mgmt node, now make changes in /etc/ansible/hosts file to include the node you will be installing software. Make sure you add public IP address as highlighted below in green color:
   sudo vi /etc/ansible/hosts
[My_Group]  
34.216.41.94 ansible_ssh_user=ubuntu ansible_ssh_private_key_file=~/.ssh/id_rsa  ansible_python_interpreter=/usr/bin/python3

6. make changes in playbooks as given below,
cd ~/playbooks

sudo vi installApache.yml
Copy the below content

---
- hosts: My_Group
  become: true
  tasks:
    - name: Install apcahe
      apt: name=apache2 state=present update_cache=yes

    - name: ensure apache started
      service: name=apache2 state=started enabled=yes


7. now execute the playbook by running the below command:
sudo ansible-playbook installApache.yml
8. This should install Apache on the nodes and should bring the apache up and running.
9. Now enter public ip address or public dns name of target server by in thr browser to see home page of Apache running.

Friday, March 9, 2018

How to Install Teamcity on Ubuntu? How to set up TeamCity on Ubuntu 16.0.4 with Postgres?

Please find below steps for installing TeamCity on Ubuntu:

Pre-requistes:
Make sure instance has at least 2 GB RAM memory(for EC2 at least small instance)
Open port 8111 in security firewall.

We need to set up some database for storing all the build information. For this exercise, lets us use Postgres:

Postgres Installation
sudo apt-get update
sudo sh -c 'echo "deb http://apt.postgresql.org/pub/repos/apt/ `lsb_release -cs`-pgdg main" >> /etc/apt/sources.list.d/pgdg.list'
sudo wget -q https://www.postgresql.org/media/keys/ACCC4CF8.asc -O - | sudo apt-key add -
sudo apt-get -y install postgresql postgresql-contrib

sudo systemctl enable postgresql
sudo systemctl start postgresql

Change the password for postgres user by entering below command
sudo passwd postgres
Enter any password but do remember the password and confirm the same password
su - postgres
createuser teamcity

Switch to sql shell by entering
psql
ALTER USER teamcity WITH ENCRYPTED password 'password';
CREATE DATABASE teamcity OWNER teamcity;
\q

type exit to come out of postgres user.

TeamCity Installation

sudo apt-get update

sudo apt-get install default-jdk -y


Download TeamCity

wget https://download.jetbrains.com/teamcity/TeamCity-2020.1.5.tar.gz
tar -xvf TeamCity-2020.1.5.tar.gz
sudo mkdir /opt/JetBrains
sudo mv TeamCity /opt/JetBrains/TeamCity
cd /opt/JetBrains/TeamCity
sudo nano /etc/init.d/teamcity
(copy the whole text colored in green)
#!/bin/sh
### BEGIN INIT INFO
# Provides:          TeamCity autostart
# Required-Start:    $remote_fs $syslog
# Required-Stop:     $remote_fs $syslog
# Default-Start:     2 3 4 5
# Default-Stop:      0 1 6
# Short-Description: Start teamcity daemon at boot time
# Description:       Enable service provided by daemon.
# /etc/init.d/teamcity -  startup script for teamcity
### END INIT INFO

#  Ensure you enter the  right  user name that  TeamCity will run  under
USER="ubuntu"

export TEAMCITY_DATA_PATH="/opt/JetBrains/TeamCity/.BuildServer"

case $1 in

start)
  start-stop-daemon --start  -c $USER --exec /opt/JetBrains/TeamCity/bin/runAll.sh start
 ;;
stop)
  start-stop-daemon --start -c $USER  --exec  /opt/JetBrains/TeamCity/bin/runAll.sh stop
 ;;
 esac

exit 0

Ctrl + O enter
Ctrl + X enter
sudo chmod +x /etc/init.d/teamcity
sudo update-rc.d teamcity defaults
sudo /etc/init.d/teamcity start

cat /opt/JetBrains/TeamCity/buildAgent/logs/teamcity-agent.log

Open browser and access team city url in the browser
http://public_dns_name:8111

Click on Proceed.
Select database type as jdbc driver as Postgres SQL from the dropdown and Click on Proceed.

now you need to download the jdbc driver at below location.
cd /opt/JetBrains/TeamCity/.BuildServer/lib/jdbc
sudo wget https://jdbc.postgresql.org/download/postgresql-9.4.1212.jar

Select database type as PostgreSQL
Refresh JDBC driver
You should see like this —> Loaded PostgreSQL JDBC driver version: 9.4

Now provide the below info
Enter database Host - localhost
Enter database name - teamcity
User name - teamcity
Password - password
Click on Proceed

please wait and watch..As It may take a few mins…

Scroll down the page, Accept license agreement
Uncheck Send anonymous usage statistics
Continue button

Register as a user and create an account

Tuesday, March 6, 2018

Free disk space requirement of 3 GB could not be met for directory /opt/JetBrains/TeamCity/buildAgent/work

By default TeamCity has 3 GB space for build. If you have smaller instance, you can change it to reduce.

Open buildAgent configuration file by executing below command:
sudo vi /opt/JetBrains/TeamCity/buildAgent/conf/buildAgent.properties

add below line
system.teamcity.agent.ensure.free.space = 2gb

save the file

Now restart the build agent
/opt/JetBrains/TeamCity/buildAgent/bin/agent.sh stop

/opt/JetBrains/TeamCity/buildAgent/bin/agent.sh start


Click here to see steps for installing Team City on Ubuntu

How to Install Ansible on Ubuntu - How to setup Ansible on Ubuntu 22.0.4

Here are the steps for installing Ansible on Ubuntu 22.0.4:

The best way to install Ansible for Ubuntu is to add the project's PPA (personal package archive) to your system. you can do it by executing the below command:


Update Repository
sudo apt-add-repository -y ppa:ansible/ansible


then you need to refresh the package by executing the below command:
sudo apt update


Now you can install Ansible:
sudo apt install -y ansible


sudo apt install python-pip -y
 ( this is just comment -  Package manager for python)


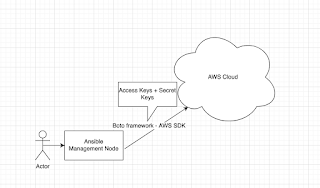
Install Boto Framework
sudo pip install boto
(This is AWS SDK for python)
 
sudo pip install boto3
sudo apt-get install python-boto -y
pip list boto | grep boto (the above command should display below output)
Ignore warning in Red color.

ansible --version


you will see this output..

ansible 2.9.6
  config file = /etc/ansible/ansible.cfg
  configured module search path = [u'/home/ubuntu/.ansible/plugins/modules', u'/usr/share/ansible/plugins/modules']
  ansible python module location = /usr/lib/python2.7/dist-packages/ansible
  executable location = /usr/bin/ansible
  python version = 2.7.12 (default, Dec  4 2017, 14:50:18) [GCC 5.4.0 20160609]


Monday, March 5, 2018

How to install Docker in Ubuntu | Install Docker in Ubuntu

Please find the steps needed for installing Docker in Ubuntu 18.0.4 instance.

sudo curl -fsSL https://download.docker.com/linux/ubuntu/gpg | sudo apt-key add -
sudo add-apt-repository "deb [arch=amd64] https://download.docker.com/linux/ubuntu $(lsb_release -cs) stable"
sudo apt-get update
sudo apt-cache policy docker-ce
sudo apt-get install -y docker-ce
sudo systemctl status docker

now press q to come out this.
ps -ef | grep docker

docker --version

sudo docker run hello-world

the above command should display the below message..

you should see below message 
Hello from Docker!
This message shows that your Docker installation appears to be working correctly.

Setup Docker Registry
Now we need to setup Docker registry. You have one of two options.

Option 1 - DockerHub as Docker Registry
Also, create an account(keep all lowercase in your username)  in the below website for storing docker images in public docker registry..

https://cloud.docker.com/
 
Option 2 - Configure Nexus as Docker Registry
Please click below link to configure Nexus as Docker Registry.
https://www.cidevops.com/2020/02/how-to-configure-nexus-as-docker.html

Option 3 - Configure AWS ECR as Docker Registry
Please click below link to configure Amazon ECR as Docker Registry.
https://www.cidevops.com/2020/05/how-to-setup-elastic-container-registry.html 
 
Option 4 - Configure Azure Container Registry
Please click below link to configure ACR in Azure.
https://www.coachdevops.com/2019/12/how-to-upload-docker-images-to-azure.html

Thursday, March 1, 2018

How to integrate SonarQube with Jenkins?

Here below are the steps for integrating SonarQube with Jenkins:
Pre-requisites: 
1. Make sure SonarQube is up and running and do the below steps.
2. Also make sure to install the sonarqube plug-in in Jenkins.

1. You need to login to SonarQube using admin/admin(default username/password) or login as your administrator credentials.

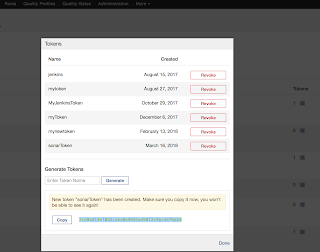
2. Click on administration, security, users, click on Tokens, under generate token. Give some value for token name and click on generate. 
3. Copy the value of token.
4. Now login to Jenkins. Manage Jenkins --> Configure System --> SonarQube installation
enter some name such as SonarQube_server, SonarQube URL, paste the token value from step # 3
5. Click on Enable injection of Sonarqube server configuration.
6. Save.
7. Click on free style job configuration. click on prepare sonarqube scanner  environment
8. enter maven goal as clean install sonar:sonar
9. click on save and build the job.